Troubleshooting – Arducam ToF Camera
Use this guide to identify connection, SDK, depth-output, and display problems with an Arducam time-of-flight (ToF) camera. Start with the basic checks, then follow the section that matches your symptom.
Camera models, board revisions, and SDK generations can require different procedures. The firmware procedure below is for the B0410 update package; it does not apply to every Arducam ToF product.
Find Your Issue
| Symptom or task | Start here |
|---|---|
| Camera is not detected or cannot be opened | Camera not detected |
| Interlacing, noise, incorrect depth, or point-cloud failure | Abnormal depth output |
| Switch between the 2 m and 4 m measurement ranges | Change the measurement range |
| Preview fails over SSH, or the example does not build | Preview and build errors |
| ToF camera does not work on Raspberry Pi 5 or CM5 | Pi 5 / CM5 troubleshooting |
| Problem remains after troubleshooting | Contact support |
Before You Start
Disconnect power before changing connections
Shut down the Raspberry Pi or NVIDIA Jetson and disconnect its power supply before inserting, removing, or reseating the camera cable.
- Confirm the camera SKU, board revision, host board, and operating system against the relevant getting-started guide.
- Check both cable ends: correct contact orientation, full insertion, and closed connector latches. On CM5, also check the carrier-board connector and adapter requirements.
- Remove sharp folds and tension from the flex cable. Check for damaged contacts or connectors.
- Keep the board dry, away from conductive surfaces, and within the operating conditions specified for the product. Handle it by its edges.
- Close other camera applications, then reproduce the issue using an unmodified Arducam example compatible with your installed SDK.
Platform guides: Raspberry Pi · NVIDIA Jetson.
Collect Basic Diagnostics
Run these commands on the host connected to the camera. For Python, use the same interpreter or virtual environment that runs your application.
cat /etc/os-release
uname -r
dpkg --print-architecture
python3 --version
python3 -m pip show ArducamDepthCamera
dpkg-query -W -f='${Package}: ${Version}\n' arducam-tof-sdk-dev
v4l2-ctl --list-devices
If v4l2-ctl is unavailable, install it using your distribution's package manager:
sudo apt update
sudo apt install v4l-utils
| Result | Interpretation / next action |
|---|---|
| Python package details are shown | Record the version and installation location. Confirm this is the environment used by the application. |
Python reports that the package or pip is missing |
Check the Python setup instructions for your SDK. This alone does not indicate a hardware fault; a C++ application may not use the Python package. |
| The SDK package version is shown | Record it and compare it with the requirements of the example you are running. |
| The SDK package is not installed | Follow the platform installation guide. A manually installed SDK may not appear in the package database. |
| Camera-related video nodes appear | Record the device names. A node's presence does not prove that frames can be captured. |
| No camera-related video node appears | Follow Camera not detected. Do not assume that another /dev/videoN node is the ToF camera. |
Diagnostic output example
This screenshot shows example package and device information. Your package versions, command output, and device numbers may differ.

Camera Not Detected
Symptoms: The SDK cannot open the camera, or the expected camera device is missing.
Check and Resolve
- Repeat the powered-off cable checks above.
- Confirm that the driver and camera configuration match your host, OS, and camera model. Use the platform getting-started guide rather than copying another camera's configuration.
- Run
v4l2-ctl --list-devicesand identify the ToF device. Use the camera-selection method documented by your SDK example; do not assume/dev/video0is always correct. - Capture the kernel messages immediately after reproducing the failure:
sudo dmesg | grep -i -E 'arducam|pivariety|camera|csi|i2c'
- On Raspberry Pi 5 or CM5, continue with the platform-specific checks if the basic setup is correct.
Verify
Run the matching Arducam example again. Confirm that the camera opens and delivers frames. If it still fails, include the full error and kernel output in your support request.
Abnormal Depth Output
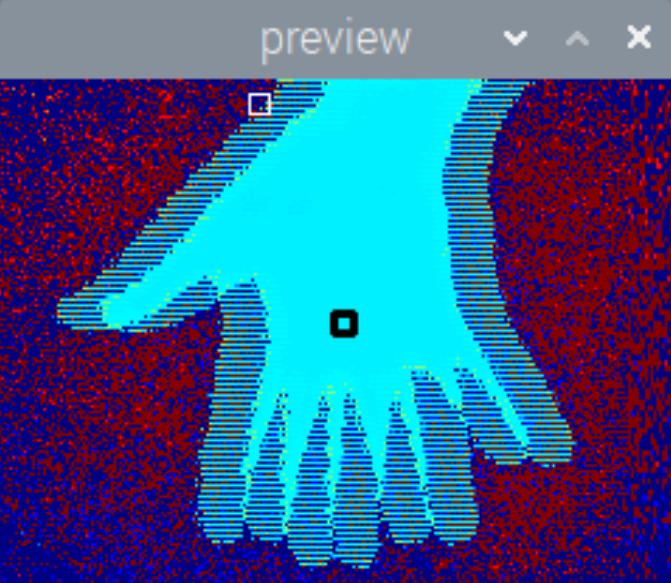
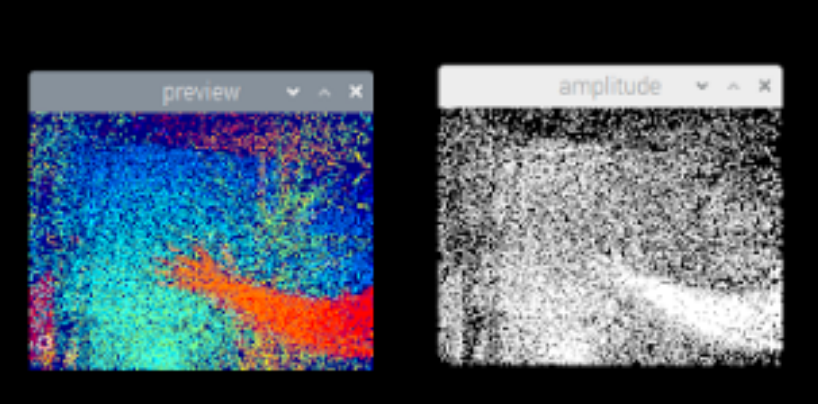
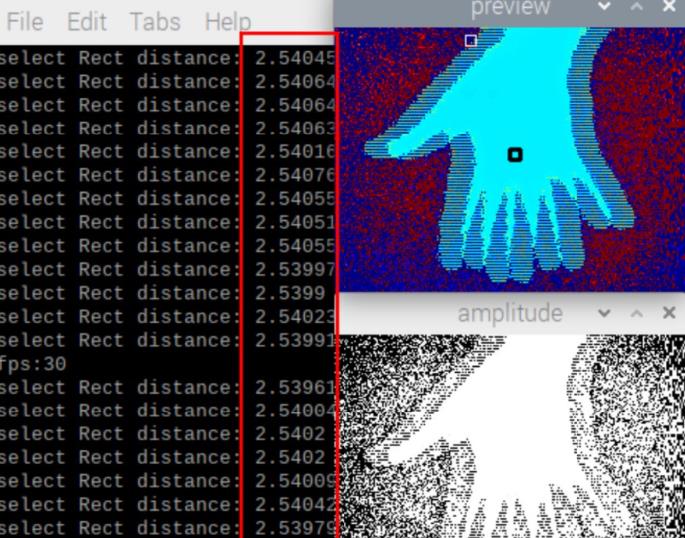
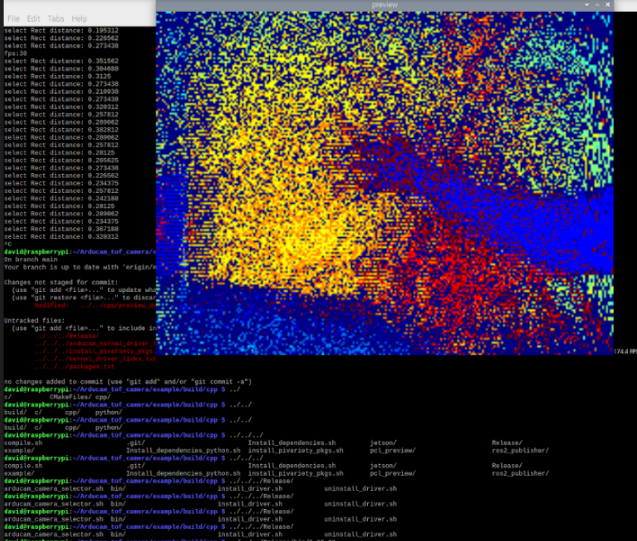
Symptoms: Interlacing, excessive noise, unexpected depth values, or a point cloud that does not render correctly.
Check and Resolve
- Reproduce the issue with the matching official example. If only your application fails, compare its frame type, buffer handling, depth units, and visualization settings with that example.
- Record the installed SDK and Python binding versions. Check the SDK version available from your configured Arducam package repository:
apt-cache policy arducam-tof-sdk-dev
- If the platform guide calls for the repository package, refresh the package index and install or update the SDK:
sudo apt update
sudo apt install arducam-tof-sdk-dev
- Follow the SDK installation guide for matching Python bindings, and rebuild C++ examples if required by the SDK update. Restart the application before testing again.
- Check the selected measurement range and depth units. Compare a stationary target at a known distance within the camera's specified working range. Record the lighting, target surface, and any confidence filtering used.
Use compatible versions
Use the SDK version recommended for your camera and platform, together with compatible example code and Python bindings. If updating the SDK does not resolve the issue, continue with the remaining checks.
Verify
Repeat the same scene and capture settings. Confirm that frames arrive consistently and depth values use the expected units. If a point-cloud viewer still fails, first establish whether the depth preview works; this helps distinguish capture problems from visualization problems.
Examples of abnormal output
Compare your output with the examples below, then follow the checks above to identify the cause.
Change the Measurement Range
Task: Select the 2 m or 4 m range on a camera that supports these modes.
Configure
Check the API and units used by your installed SDK. In the documented HQVGA API, RANGE accepts 2000 or 4000 millimeters. Other device types can use different controls; for example, the documented VGA device derives its range from the working mode.
For the ArducamTOFCamera.hpp C++ API, insert the following into an example after the camera has been opened and depth streaming has started. This is a fragment, not a standalone program:
// HQVGA camera: select 2000 mm (2 m) or 4000 mm (4 m).
constexpr int range_mm = 4000;
tof.setControl(Arducam::Control::RANGE, range_mm);

int actual_range_mm = 0;
tof.getControl(Arducam::Control::RANGE, &actual_range_mm);
std::cout << "Measurement range: " << actual_range_mm << " mm\n";
Check control-operation errors according to your installed SDK. Keep the preview's depth-to-color scaling consistent with the intended visualization range; changing display scaling alone does not change the camera's measurement range.
Verify
Confirm the reported range matches the requested value, then test a stationary target within the specified working range. If the control is unavailable, check the camera model and SDK API before changing enum names or numeric values.
References: SDK controls · C++ depth-preview example.
Preview and Build Errors
Preview Does Not Open Over SSH
Symptoms: The program starts but cannot create a preview window, or reports a display/GUI error.
Resolve:
- Test the preview from a terminal in the host's local graphical desktop session.
- For remote viewing, use a configured remote desktop or X11 forwarding supported by your application. See the Raspberry Pi remote-access guide.
- If no graphical session is available, use a non-GUI capture example provided for your SDK, if available, to separate frame acquisition from display problems.
About DISPLAY
export DISPLAY=:0 only selects a display address. It does not create a desktop session or grant permission to use one. It is appropriate only when a local X display exists at that address and your user is authorized to access it. Do not overwrite the DISPLAY value set by SSH when using X11 forwarding.
Verify: Confirm that the same example captures frames and opens a window in the intended graphical session.
SSH-related error example

The Example Does Not Compile
Symptoms: The build reports missing headers, missing libraries, undefined references, or an incompatible API.
Resolve: Use example code matching the installed SDK, install the dependencies listed in its build guide, and rebuild. Save the build command and the first compiler or linker error. Changing DISPLAY does not resolve these compiler or linker errors.
Verify: The build completes successfully and produces the expected executable. Diagnose any subsequent camera or display error separately.
ToF Camera Does Not Work on Raspberry Pi 5 / CM5
Raspberry Pi 5 / CM5
If your Arducam ToF camera does not work on Raspberry Pi 5 or Compute Module 5 (CM5), follow the troubleshooting steps below.
1. Confirm the Setup
Complete the basic checks and record the camera SKU, board revision, OS, SDK version, and kernel messages. For CM5, also identify the carrier board and camera connector used.
If the issue persists, check whether the B0410 firmware procedure below applies to your camera. A connection or SDK problem does not automatically mean that firmware must be updated.
2. Prepare the Update Tool
Download the B0410 firmware update package to the host connected to the camera. The commands below apply to the B0410_Tof_Firmware.tar.gz package layout shown in this guide. If the supplied package has a different layout, use its included instructions.
Check the OS package architecture:
dpkg --print-architecture
Extract the outer archive from the directory where it was downloaded:
tar -xzf B0410_Tof_Firmware.tar.gz
Choose one directory:
| Architecture reported | Command |
|---|---|
arm64 |
cd B0410_Tof_Firmware/aarch64/ |
armhf |
cd B0410_Tof_Firmware/armv7l/ |
Then extract the nested archive and enter the tool directory:
tar -xzf B0410_Tof_Firmware.tar.gz
cd b0410_tof_firmware/
This B0410 firmware update tool requires libtinfo5:
sudo apt update
sudo apt install libtinfo5
If the package is unavailable on your OS, request an update-tool build compatible with that OS. Do not assume that another libtinfo major version can replace it by renaming or symlinking libraries.
3. Enter Camera Recovery Mode
- Shut down the host and disconnect its power supply.
- Connect the camera and verify the cable orientation.
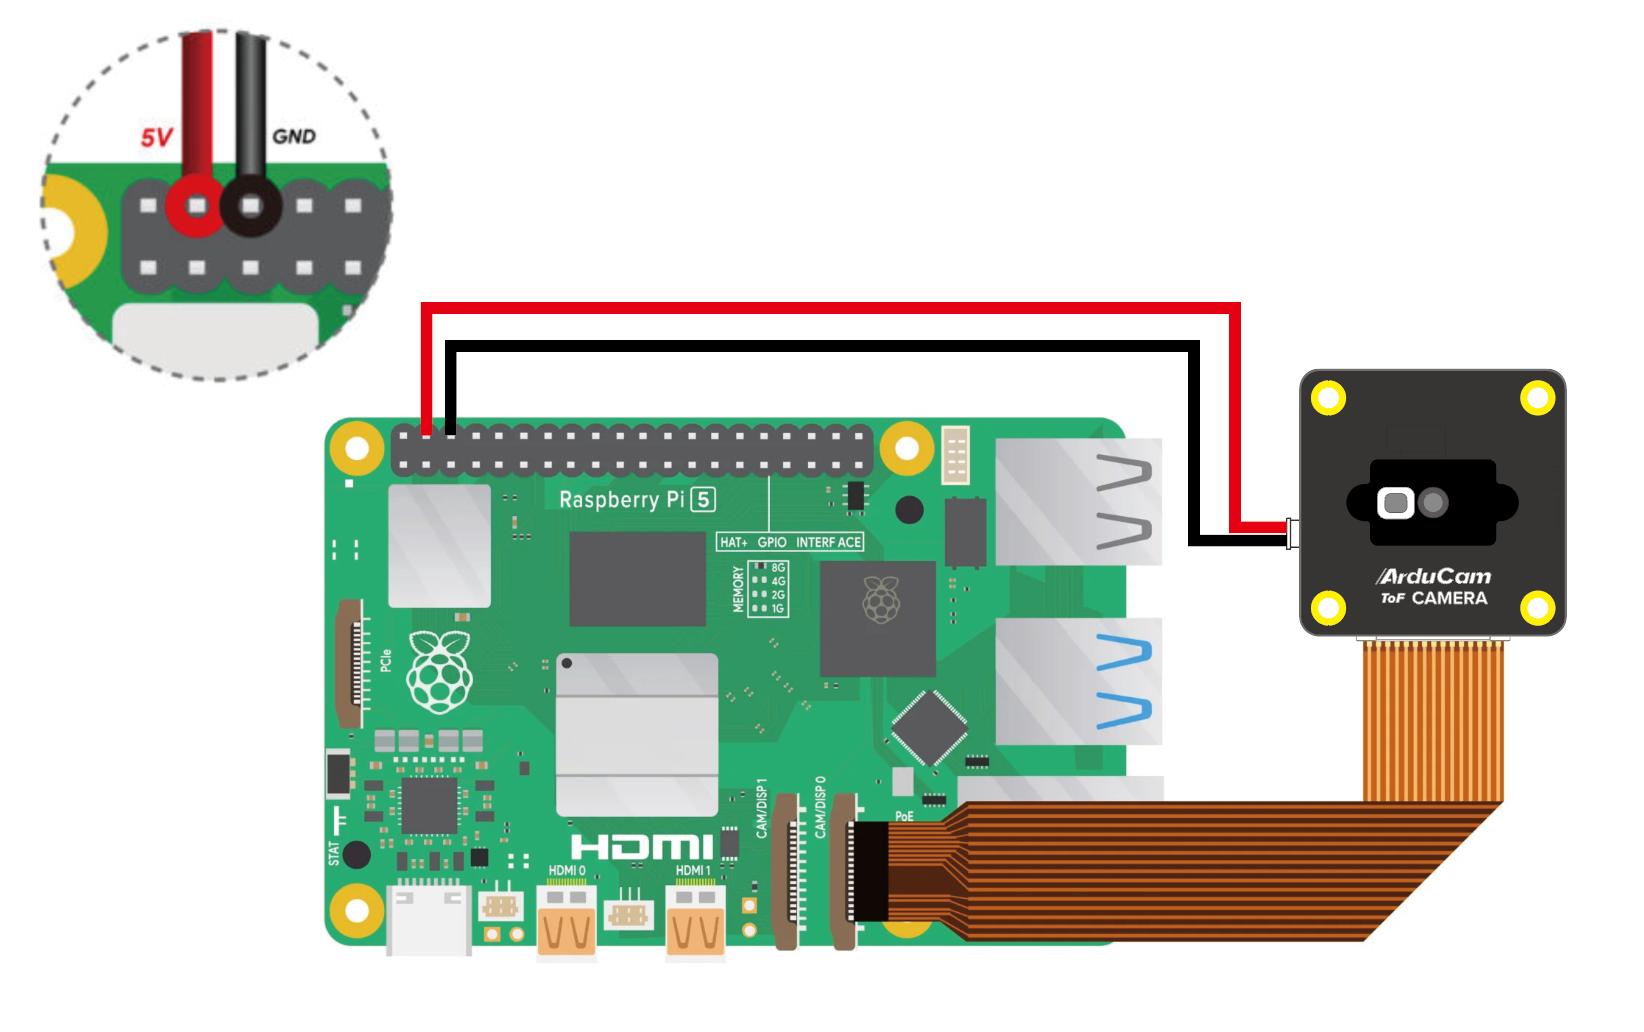
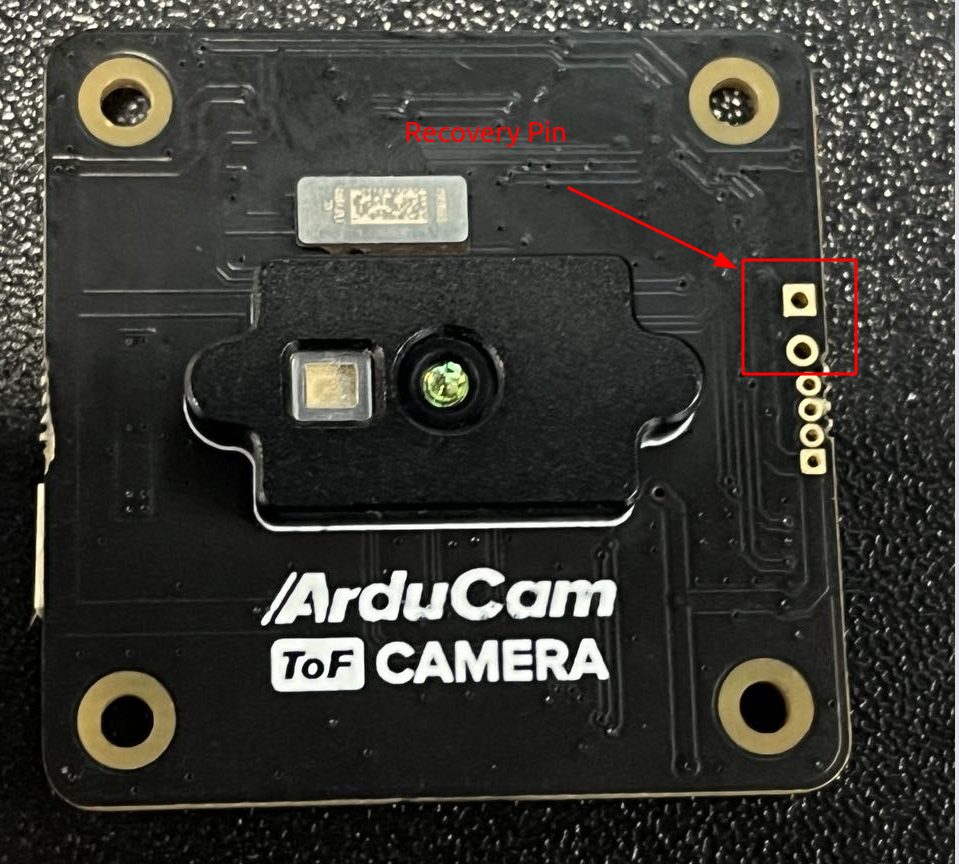
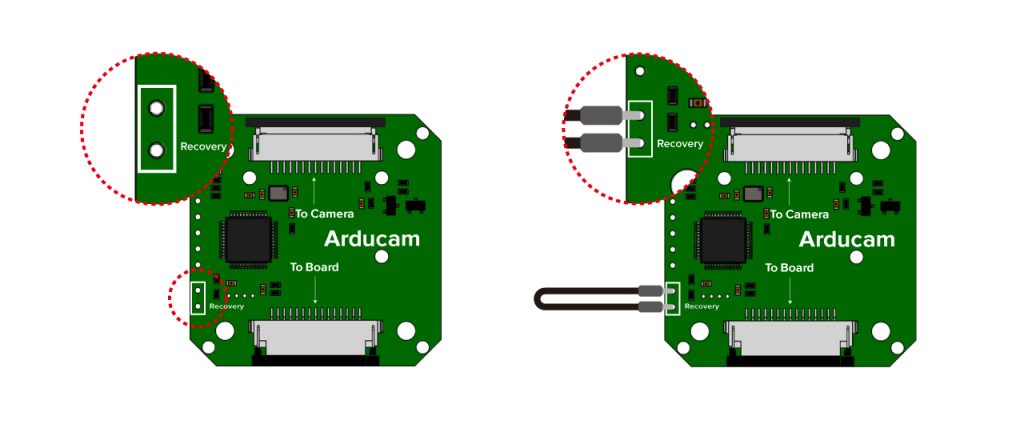
- With power disconnected, bridge the camera's designated recovery contacts as shown in the matching camera-board instructions.
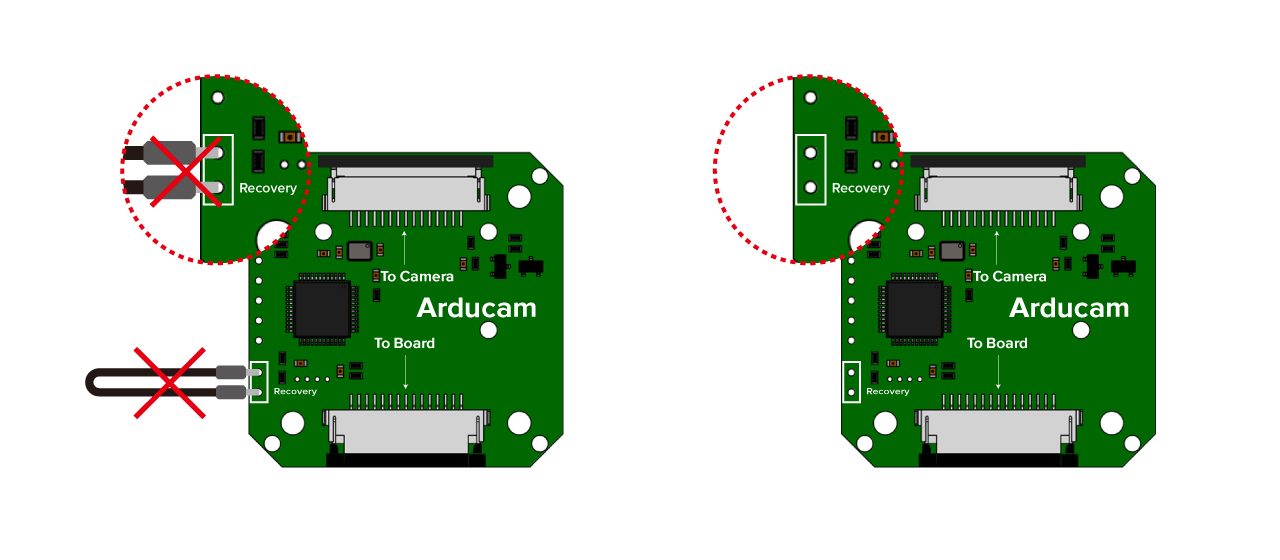
- Power on the host. Remove the recovery jumper as specified by those instructions, without disturbing the camera cable or touching adjacent contacts.
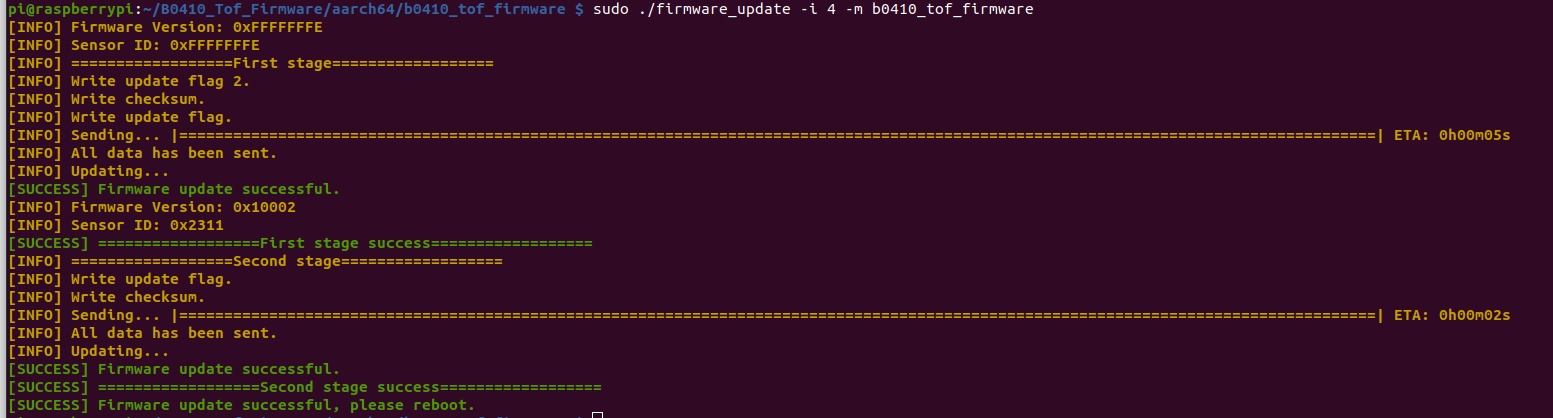
This is camera recovery mode, not Raspberry Pi bootloader recovery. For this B0410 update tool, the recovery firmware marker is 0xFFFFFFFE; it is not a normal operating firmware version. If the updater's detection output indicates that recovery mode has not been entered, stop and check the recovery procedure before retrying.
B0410 connection and recovery mode
Use these only when the illustrated camera board matches your hardware.
4. Identify the Camera's I²C Bus
Inspect the kernel messages:
sudo dmesg | grep -i arducam
Identify the bus associated with the connected ToF camera. The bus ID depends on the host, CSI connector, carrier board, and device-tree configuration. Use the ID reported for your camera, not a number copied from a screenshot. If the output is ambiguous, confirm the bus using the platform instructions or Arducam support before updating.
Identify the camera’s I²C bus

5. Update the Firmware
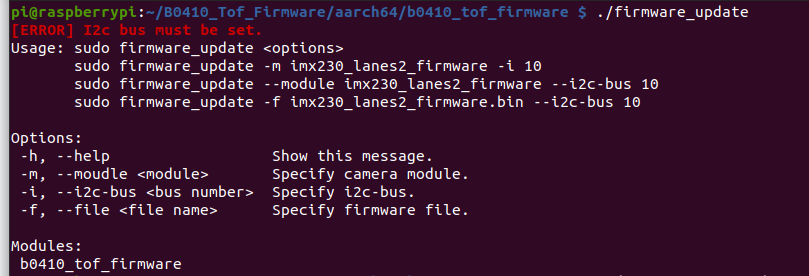
Close all camera applications. In the tool directory, run the following command after replacing <I2C_BUS> with the confirmed numeric bus ID:
sudo ./firmware_update -i <I2C_BUS> -m b0410_tof_firmware
Keep power connected until the tool finishes. Check the complete output for a successful update; if it reports an error, save the log and resolve that error before retrying.
After a successful update, reboot:
sudo reboot
6. Verify Normal Operation
Run the matching Arducam ToF example after reboot. Confirm that the camera opens and produces depth frames in normal operation. If the failure persists, record the updater output and the new camera error; do not repeatedly flash firmware without identifying the failure.
Firmware update output and tool help
Contact Support
If the issue remains, contact support@arducam.com with:
- Camera SKU and board revision; a clear photo of the board and both cable connections.
- Host model and carrier board, including the CM5 carrier model if applicable.
- OS, kernel, architecture, SDK version, and Python environment from the basic diagnostics.
- The exact example or application version, command used, and complete error output.
- Expected behavior, observed behavior, and the steps needed to reproduce the issue.
- Troubleshooting already attempted and its result. Include updater logs if firmware was changed.
Copy logs as text where possible. Include screenshots or a short recording when the problem concerns depth output or image quality.