Quick Start
Abstract
We’ve provided some pre-built binaries that you can just drag and drop onto your Pico4ML to make sure everything is working even before you start writing your code.
Pre-trained Models
Wake-word detection
A demo where Pico4ML provides always-on wake-word detection on whether someone is saying yes or no, using its onboard microphone and pre-trained speech detection model.
Magic Wand (Gesture Detection)
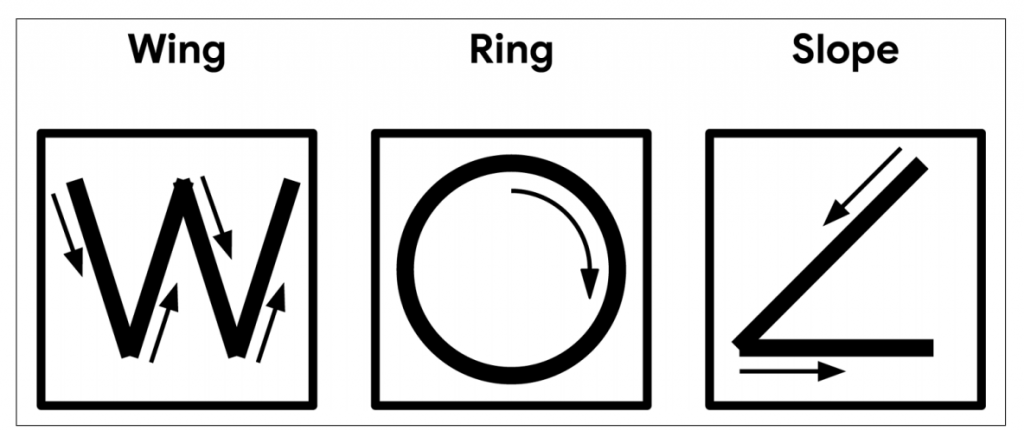
A demo where pico4ml casts several types of spells in one of the following three gestures: “Wing”, “Ring” and “Slope”, using its IMU and pre-trained gesture detection model.
Person Detection
A demo where pico4ML predicts the probabilities of the presence of a person with a Himax HM01B0 camera module.
First Use
Wake-word Detection
Quote
- Click on the link: micro speech.uf2 (The "micro_speech.uf2" file will be downloaded.)
- Go grab your Raspberry Pi or laptop, then press and hold the BOOTSEL button on your Pico4ML while you plug the other end of the micro USB cable into the board.
- Release the button after the board is plugged in. A disk volume called RPI-RP2 should pop up on your desktop.
- Double-click to open it, and then drag and drop the UF2 file into it. The volume will automatically unmount and the screen should light up.
- Hold your Pico4ML closer and say “yes” or “no”. The screen will display the corresponding word.
Magic Wand (Gesture Detection)
Quote
- Click on the link: micro wand.uf2 (The "micro_wand.uf2" file will be downloaded.)
- Repeat the 2nd-5th steps mentioned in “Wake-word Detection” to light up the screen.
- Wave your Pico4ML quickly in a W (wing), O (ring), or L (slope) shape. The screen will display the corresponding mark.
Person Detection
Quote
- Click on the link: person detection int8.uf2 (The "person_detection_int8.uf2" file will be downloaded.)
- Repeat the 2nd-5th steps mentioned in “Wake-word Detection ” to light up the screen.
- Hold your Pico4ML to capture images. The screen will display the image and the probabilities of the presence of a person.
