16MP IMX519
Introduction
Based on the 16MP Sony IMX519 sensor, Arducam released a series of 16MP cameras for Raspberry Pi. With 2 times higher resolution than the V2 camera, and 40% higher than the HQ camera, they are better choices for a whole world of industrial/consumer/etc. applications. They can work with the latest software from the foundation and leverages the same tuning algorithms used in the official camera modules.
Image Sensor
| Sensor Model | IMX519 |
|---|---|
| Shutter Type | Rolling Shutter |
| Active Pixels | 4656 (H) × 3496 (V) |
| Resolution | 16MP |
| Image Sensor Format | Type 1/2.53″ |
| Pixel Size | 1.22μm×1.22μm |
| CSI-2 Data Output | 2-lane mode |
| Data Format | RAW10/8, COMP8 |
Autofocus
Arducam 16MP IMX519 autofocus Camera Modules are designed for you to control the focus via software, so you can see closer and see where you want to see.
Platform Compatibility
Supported Operating Systems
This camera is compatible with all modern Raspberry Pi models and operating systems. Trixie OS is also supported.
| Platform | Trixie | Bookworm | Bullseye |
|---|---|---|---|
| Raspberry Pi 5 / CM5 | ✅ | ✅ | ❌ |
| Raspberry Pi 4B / 3B+ / 3A+ / Zero / Zero 2 W | ✅ | ✅ | ✅ |
| Raspberry Pi CM3 / CM3+ / CM4 Requires adapter board |
✅ | ✅ | ✅ |
Buster OS Not Supported
Please note that Raspberry Pi OS Buster is not compatible with the required libcamera stack. We recommend using Bullseye or a newer OS version.
Products Catalog
| Product Image | SKU | Pin/Connect Type | Features | Lens Type | Field of View(D/H/V) | Focus Type | IR Sensitivity |
|---|---|---|---|---|---|---|---|
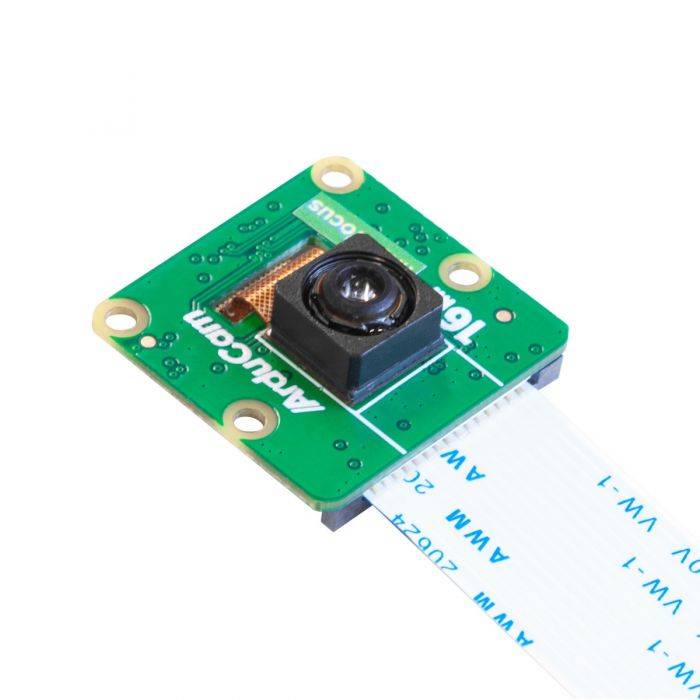 |
B0386 | 22pin/Top | MIni Size | Stock Lens | 66°(H) x 49.5°(V) | Fixed Focus | without IR-cut filter |
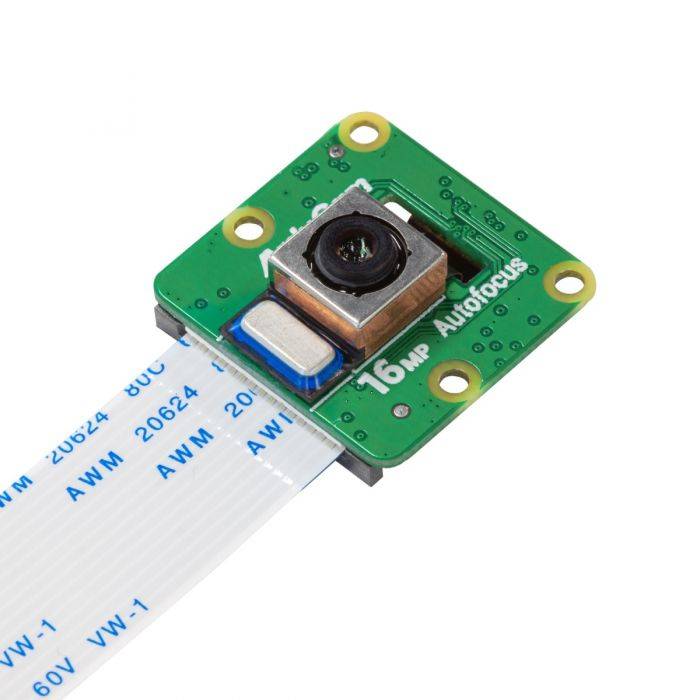 |
B0371 | 22pin/Top | High Resolution | AutoFocus | 650nm IR cut filter | ||
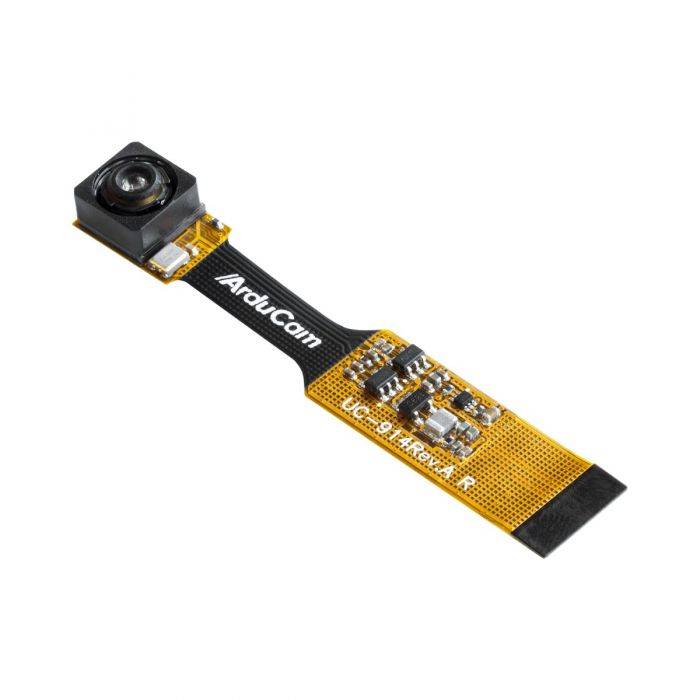 |
B0389 | 15/NA | Miniature Camera | 65°(H) x 48.8°(V) | Fixed Focus | without IR-cut filter | |
| B0391 | 22/NA | ||||||
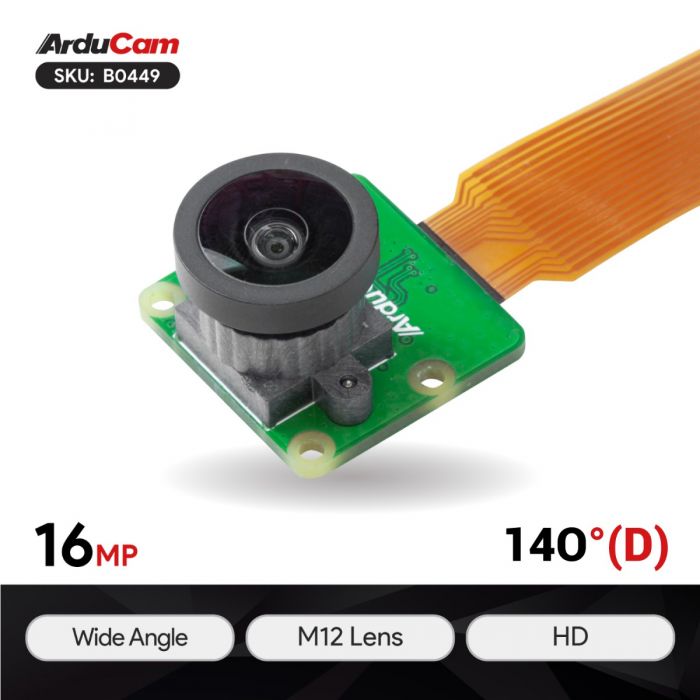 |
B0449 | 22/Top | Wide Angle | M12 Lens | 140°(D)×120°(H)×95°(V) | Manual Focus | 650nm IR-cut filter |
Hardware Connection
Please refer to the following doc for common hardware connection method of RPI Camera:
Quick Start Guide - Hardware Connection
Guide for Autofocus Cameras
| Product Image | SKU | Pin/Connect Type | Features | Lens Type | Field of View(D/H/V) | Focus Type | IR Sensitivity |
|---|---|---|---|---|---|---|---|
|
B0371 | 15/Bottom | High Resolution | Stock Lens | 66°(H) x 49.5°(V) | AutoFocus | 650nm IR cut filter |
Autofocus models require a custom version of the libcamera library provided by Arducam to enable focus control functions. The setup involves running an installation script and manually enabling the driver.
The software setup is a mandatory three-step process.
Internet Connection Required
Your Raspberry Pi must be connected to the internet to download the necessary software packages.
Step 1: Download the Installation Script
This script downloads the necessary tools to install Arducam's custom software.
wget -O install_pivariety_pkgs.sh https://github.com/ArduCAM/Arducam-Pivariety-V4L2-Driver/releases/download/install_script/install_pivariety_pkgs.sh
chmod +x install_pivariety_pkgs.sh
Step 2: Install Arducam libcamera Software
Next, use the script to install the custom libcamera library and applications.
Install libcamera-dev:
./install_pivariety_pkgs.sh -p libcamera_dev
Install libcamera-apps:
./install_pivariety_pkgs.sh -p libcamera_apps
Note
A reboot is not required yet. Proceed directly to Step 3.
Step 3: Enable the Camera Driver
You must now manually edit your config.txt file to enable the camera.
Raspberry Pi 5 & CM5
Pi 5 supports both Trixie and Bookworm OS. The configuration file is located at /boot/firmware/config.txt for both systems.
-
Open the configuration file:
sudo nano /boot/firmware/config.txt -
Disable camera auto-detection:
camera_auto_detect=0 -
Add imx519 overlay under the
[all]section:dtoverlay=imx519 -
Save and reboot:
sudo reboot
Camera Port Configuration
For Pi 5 & CM5 with cameras connected to CAM0 port, use:
dtoverlay=imx519,cam0
Raspberry Pi 4
Pi 4 supports Trixie, Bookworm and Bullseye OS with different configuration file locations.
sudo nano /boot/firmware/config.txt
sudo nano /boot/config.txt
Configuration steps (same for all OS versions):
- Set
camera_auto_detect=0 - Add
dtoverlay=imx519under the[all]section - Save the file and reboot:
sudo reboot
Raspberry Pi Zero to Pi 3
These models support Trixie, Bookworm and Bullseye OS with different setup procedures.
Standard configuration using /boot/firmware/config.txt:
sudo nano /boot/firmware/config.txt
- Set
camera_auto_detect=0 - Add
dtoverlay=imx519under[all]section - Save the file and reboot:
sudo reboot
Two-step process required:
Step 1: Edit config.txt
sudo nano /boot/config.txt
- Set
camera_auto_detect=0 - Add
dtoverlay=imx519under[all]section - Save the file but do not reboot yet - proceed to Step 2
Step 2: Enable Glamor Graphics
sudo raspi-config
Navigate to 6 Advanced Options → A3 Glamor → Enable → Reboot
Raspberry Pi Compute Module 3 & 4
CM3 and CM4 support all operating systems with dual camera ports (cam0, cam1).
sudo nano /boot/firmware/config.txt
sudo nano /boot/config.txt
Configuration steps (same for all OS versions):
- Set
camera_auto_detect=0 - Add
dtoverlay=imx519under[all]section - Save the file and reboot:
sudo reboot
Camera Port Selection
For CAM0 interface usage, modify the overlay line to:
dtoverlay=imx519,cam0
Camera Usage
After system configuration and reboot, your camera is ready for operation.
Using rpicam-apps suite:
-
List available cameras:
rpicam-still --list-cameras -
Live preview (Ctrl+C to exit):
rpicam-still -t 0 -
Capture image with 5-second preview:
rpicam-still -t 5000 -o test.jpg
Using libcamera-apps suite:
-
List available cameras:
libcamera-still --list-cameras -
Live preview (Ctrl+C to exit):
libcamera-still -t 0 -
Capture image with 5-second preview:
libcamera-still -t 5000 -o test.jpg
AF/Manual Focus Function
Abstract
For cameras with focus motors, we have added autofocus parameters to enable single autofocus and continuous autofocus functions.
Please refer to the following doc for details:
Autofocus/Manual Focus Function for Arducam 16MP Autofocus Camera
Guide for Fixed-Focus Cameras
| Product Image | SKU | Pin/Connect Type | Features | Lens Type | Field of View(D/H/V) | Focus Type | IR Sensitivity |
|---|---|---|---|---|---|---|---|
|
B0386 | 15/Top | MIni Size | Stock Lens | 66°(H) x 49.5°(V) | Fixed Focus | without IR-cut filter |
|
B0389 | 15/NA | Miniature Camera | 65°(H) x 48.8°(V) | Fixed Focus | without IR-cut filter | |
| B0391 | 22/NA | ||||||
|
B0449 | 15/Top | Wide Angle | M12 Lens | 140°(D)×120°(H)×95°(V) | Manual Focus | 650nm IR-cut filter |
The setup process is nearly identical to the autofocus models, but requires a specific parameter in the configuration file to prevent warnings.
Step 1: Install Arducam libcamera
The libcamera installation process is identical to the Autofocus cameras. Please complete Step 1 & 2 from the section above before proceeding.
Step 2: Enable the Camera Driver
Manually edit config.txt. The key difference is adding the vcm=off parameter, which disables the autofocus motor controller and prevents system warnings.
Raspberry Pi 5 & CM5
Pi 5 supports both Trixie and Bookworm OS. The configuration file is located at /boot/firmware/config.txt for both systems.
-
Open the configuration file:
sudo nano /boot/firmware/config.txt -
Disable camera auto-detection:
camera_auto_detect=0 -
Add imx519 overlay under the
[all]section:dtoverlay=imx519,vcm=off -
Save and reboot:
sudo reboot
Camera Port Configuration
For Pi 5 & CM5 with cameras connected to CAM0 port, use:
dtoverlay=imx519,cam0,vcm=off
Raspberry Pi 4
Pi 4 supports Trixie, Bookworm and Bullseye OS with different configuration file locations.
sudo nano /boot/firmware/config.txt
sudo nano /boot/config.txt
Configuration steps (same for all OS versions):
- Set
camera_auto_detect=0 - Add
dtoverlay=imx519,vcm=offunder the[all]section - Save the file and reboot:
sudo reboot
Raspberry Pi Zero to Pi 3
These models support Trixie, Bookworm and Bullseye OS with different setup procedures.
Standard configuration using /boot/firmware/config.txt:
sudo nano /boot/firmware/config.txt
- Set
camera_auto_detect=0 - Add
dtoverlay=imx519,vcm=offunder[all]section - Save the file and reboot:
sudo reboot
Two-step process required:
Step 1: Edit config.txt
sudo nano /boot/config.txt
- Set
camera_auto_detect=0 - Add
dtoverlay=imx519,vcm=offunder[all]section - Save the file but do not reboot yet - proceed to Step 2
Step 2: Enable Glamor Graphics
sudo raspi-config
Navigate to 6 Advanced Options → A3 Glamor → Enable → Reboot
Raspberry Pi Compute Module 3 & 4
CM3 and CM4 support all operating systems with dual camera ports (cam0, cam1).
sudo nano /boot/firmware/config.txt
sudo nano /boot/config.txt
Configuration steps (same for all OS versions):
- Set
camera_auto_detect=0 - Add
dtoverlay=imx519,vcm=offunder[all]section - Save the file and reboot:
sudo reboot
Camera Port Selection
For CAM0 interface usage, modify the overlay line to:
dtoverlay=imx519,cam0,vcm=off
Camera Usage
After system configuration and reboot, your camera is ready for operation.
Using rpicam-apps suite:
-
List available cameras:
rpicam-still --list-cameras -
Live preview (Ctrl+C to exit):
rpicam-still -t 0 -
Capture image with 5-second preview:
rpicam-still -t 5000 -o test.jpg
Using libcamera-apps suite:
-
List available cameras:
libcamera-still --list-cameras -
Live preview (Ctrl+C to exit):
libcamera-still -t 0 -
Capture image with 5-second preview:
libcamera-still -t 5000 -o test.jpg
Troubleshooting
If you encounter display issues such as black screens, the camera may not be properly recognized by the system.
Common troubleshooting resources: - Common Troubleshooting Guide
For persistent issues, please contact our support team for additional assistance.