Quick start
Automatic IR-Cut filter control
The majority of switchable IR-cut filters are deployed for surveillance use, which requires the camera to maintain color accuracy throughout the daytime and night vision at night.
We don’t have to tell whether it’s already nighttime, because a light-sensitive trigger would do the work. A photoresistor is such a trigger, and it can determine whether the lighting condition is poor, so the IR illumination should be turned on and the IR filter switched off.
Arducam day-night vision cameras use photoresistors to automate the IR switching. This is the default option and no extra settings are required.
Manual IR-Cut filter control workaround
Although automatic IR-cut filter control can satisfy most users, some may still want a more proactive method to control it manually. Some workarounds are needed for this.
Working like a normal camera: Keep the IR filter always on
The black and red wires will lead you to a connector of the IR cut-off filter to the camera board. Unplugging the connector will disable the IR filter switch and make it a normal camera.
Working like a NoIR camera: Keep the IR filter always off
Photoresistors rely on lighting conditions to work. If you cover the photo resistor with a non-translucent material, it will produce the same result as a NoIR camera.
Manually control the IR-filter with scripts
Install the driver and libcamera apps
Find your corresponding camera in the following two links, and then execute the following command
Note
If you do not find your camera please contact us.(support@arducam.com)
The steps below are compatible with both Raspberry Pi 5 and previous models.
1. Remove the photoresistor If you want the photoresistor to quit controlling and your scripts to take over, remove the photoresistor first.
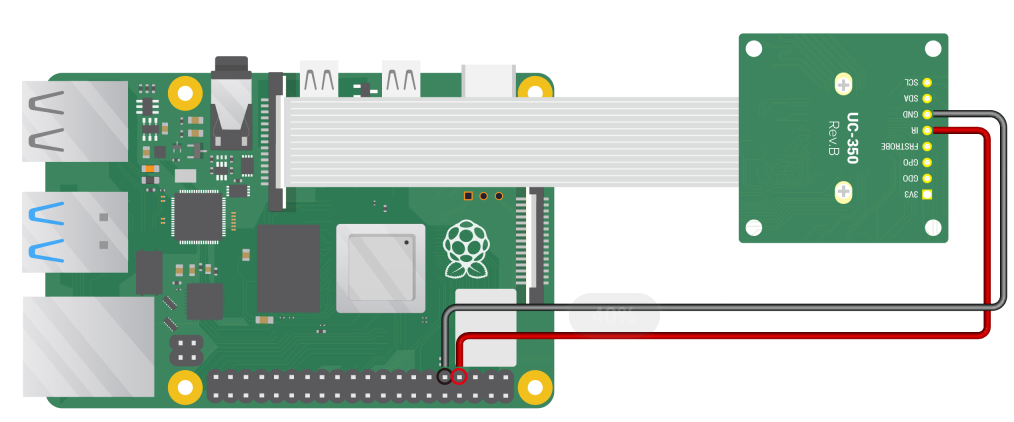
2. Connect the Camera IR and GND pins to the RPI GPIO
Do it as shown in the image below. You may need some soldering and jumper wires.
 Connect the camera IR and GND pins to RPI GPIO
3. Download the code
git clone https://github.com/ArduCAM/RPI_Motorized_IRCut_Control.git
4. Compile source code
install required libraries:
sudo apt-get install libgpiod-dev
Enter the folder:
cd RPI_Motorized_IRCut_Control/camIrCutControl/
Compile source code:
make
5. Control the IR-cut filter with commands
Switch the IR-cut filter on:
./irCut 1
Switch off the IR-cut filter:
./irCut 0